5 steps to build PowerApps & Power Automate custom document
Using SharePoint to store organizational data such as documents is a great practice and using its default functionality out of the box is a great way to manage the solution. What happens if one wants to customize their search options and document searching methods specifically to meet their organization's needs?
In this article, we discuss exactly this – i.e. how using PowerApps and Power Automate, we can build a custom SharePoint based searching application, which can help you tailor this solution to your specific needs. We would go through the guidelines for creating the solution and provide high level concepts, without getting into granular technical aspects for each phase.
5 steps to build a SharePoint based PowerApps and Power Automate searching application
Step One: Planning the SharePoint site:
The key step for setting up the SharePoint site is adequate planning of the application you want to build, including deciding the foundations of the application. To plan the SharePoint site:
- What is the goal of the application? (This is a question which is crucial but general for any application)
- Who would be the end-users of the application? (Depending on the culture of the organization and if the end-users are technical/business oriented)
- From which devices (desktop, mobile, teams) the application would be used?
- What is the data (Word, Excel, images, etc.) which the application needs to work with?
- What would be the search properties (based on the metadata that would need to be added to the documents)?
- How to consider the application design (what design structure would the application be based on)?
Once the plan is completed across all the above mentioned aspects, it’s time to build the SharePoint Document site.
Create a SharePoint Site wherein, you want to store the organization’s documents, along with a folder structure which you can complete flexibility to define.
Step two: build a library template and a custom manage document Properties
In SharePoint when you add a file into the document library, you will get a list of default properties that are searchable in the respective library. In our case, we want to add more properties to the document library to have those properties made searchable.
- Create a document library that can be saved as a template and can be used all over the site. In addition, we can add columns to that library that we wish to search in the PowerApps custom SharePoint document search app later.
- Next, we map the custom columns to be searchable in the SharePoint searching API by managing the search schema in SharePoint.
Step three: build a canvas app with searchable fields.
After configuring and preparing the managed columns for the searchable API it’s time to build the application.
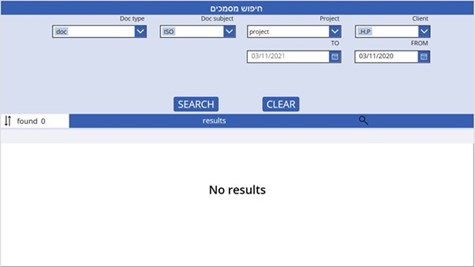
- Create a new canvas application with the fields to be searched and a gallery to show the results. Example for an app with custom fields and a gallery.
- Send your data to your search flow.

Step four: build a power automate flow to be triggered from your app
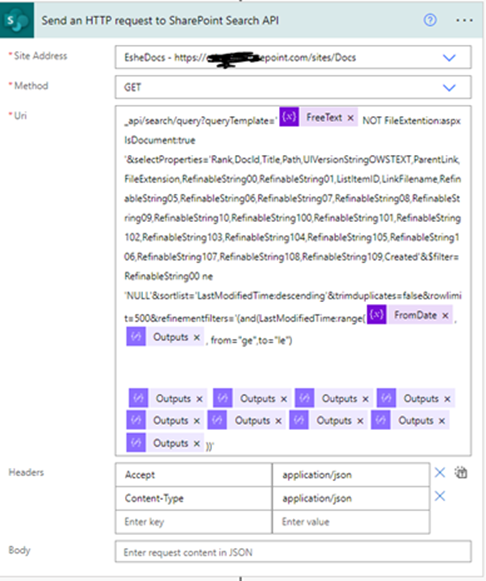
- Prepare variables for the API call to be equal to the manage properties schema you prepared (step two, 2). for example Extra-field1 is mapped into RefinableString105 so then we will run a compose control like that: if(empty(variables('extraField1')), '', concat(',RefinableString105:"', variables('extraField1'), '"'))
- After preparing all the fields variables it is time to run the control “send an HTTP request”.
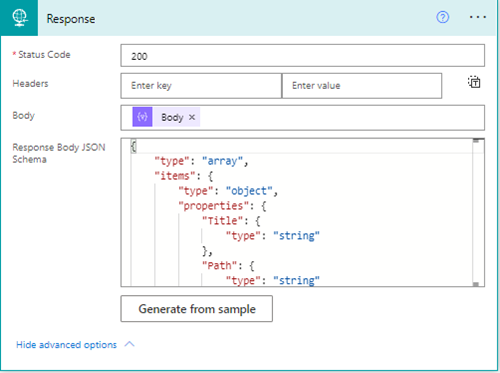
3. Get the results and parse them using Parse JSON control
4. Organize the results by using Select control
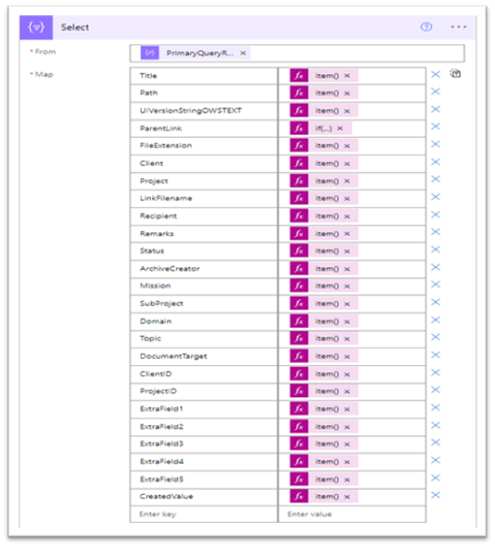
5. Organize the results by using Select control
Step five: process and use the results from the flow
After getting the search results from the flow we will need to show these in the application and to achieve it, we can use a gallery.
- The flow will have a collection with data of the results.

2. This collection can then be loaded into the gallery.

3. The gallery will then show the results of the collection created, for example:
3.1. Showing the file title by using thisIem.title.
3.2. Open this file by using the path we received in our collection from the flow.
4. You can then add any manipulation and extra features you may want to the given results.
To conclude, working with PowerApps and power automate to retrieve data from SharePoint can be very useful and an easy task to achieve. The results would make the process more efficient (by saving time) and enable a more tailored but user friendly experience for the organization.